- Download Installer @ https://www.ftpgetter.com/ftpgetter_pro_setup.exe
- Run the installer.
- Accept the license agreement > Next
- Leave Destination as is > Next
- Place a check to install FTPGetter Professional Launcher. This allows the app to run as a service. > Next
- Uncheck the last 2 options > Next > Install
- Uncheck “View the flash demo” > Finish
- The application will open up telling you it’s not registered - Click Continue – Click no for creating a test connection.
- At the top menu bar click help (3rd option from the left) - Click About
- At the About Screen hold CTRL+A - this will open the license registration screen.
- Type in the License ID > Get from Kalleo Technologies
- Select the network adapter being used by the workstation.
- Copy the Subject line text and send an email to support@FTPGetter.com using that subject line for the email Subject.
- Click OK.
- The FTPGetter helpdesk will send back a regcode.zip file that contains a license key file named ftpgetter3pro.lic. Unzip the file.
- Start FTPGetter back up. The application will open up telling you it’s not registered - Click Continue
- Type CTRL-k. An explorer window opens up to the folder containing the FTPGetter files. Place the ftpgetter3pro.lic file you unzipped earlier in this directory. The directory is here: C:ProgramDataFTPGetter if you need to get to it later.
- Close the FTPGetter application and restart it. The nag screen should now be gone and we can start the setup.
- If you are going to run the service (suggest you do for automated tasks), you must set the service to run with an account that has access to the source/target folder. Set up the folders with UNC names or IPs, not mapped drives. A mapped drive will not be available if the user the drive was created under is not signed in.
- Once the software has been installed and properly licensed:
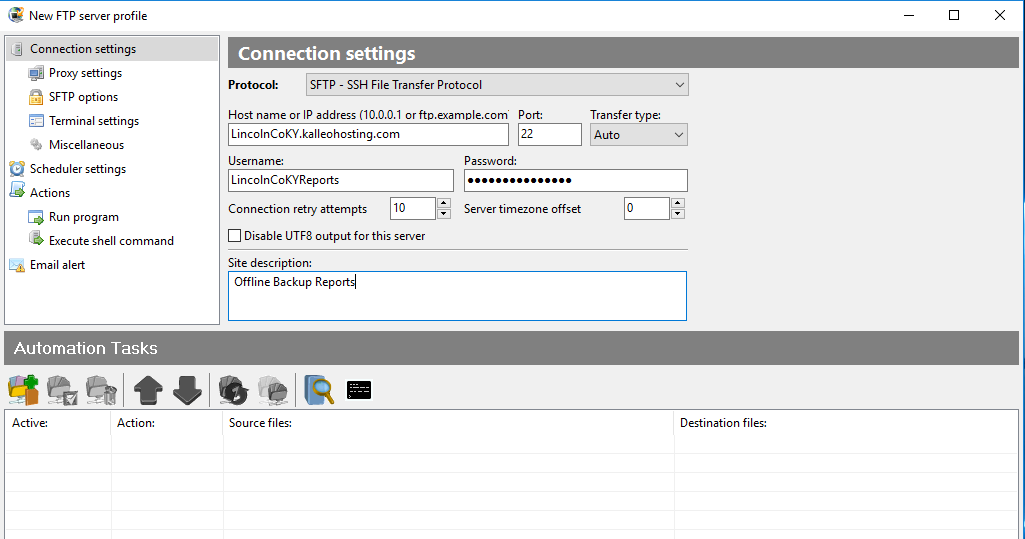
- At the top menu bar click Profiles - New Profile
- Protocol - SFTP - SSH File Transfer Protocol. Leave port # as is.
- Host Name / IP – “ClientName”.kalleohosting.com Contact Kalleo Technologies If you do not know your client name.
- Username – Get from Kalleo Technologies
- Password – Get from Kalleo Technologies
- On the left-hand side, click on Schedule Settings and set for 4 hours.
- Click Save.
- Right click the Profile and click “Profile Properties”
- At the bottom of the window is the Automation Task Pane - Click "Create a new automated task" (folder icon and green plus)
- Operation - Download - Click “Next”
- Select Source File or Folder - place a /* in the text field, then click “Browse”.
- You will be presented with a Host Key. You MUST accept the key and close the browse window.
- Select destination File or Folder – This is the folder you create on the local workstation or network that the files will be download to.
- Transfer only new/modified – click the dropdown and select -off- Click “Next”
- Place a check in “Delete Source Files After Successful Transfer” and “no compare the size of files before deleting”- Click “Next”
- Finish
You can test your profile immediately by right clicking on the profile that you just created and select execute. Files, if available, will download into your target folder.
Once the software has been installed and properly licensed:
- At the top menu bar click Profiles - New Profile
- Protocol - SFTP - SSH File Transfer Protocol. Leave port # as is.
- Host Name / IP – “ClientName”.kalleohosting.com Contact Kalleo Technologies If you do not know your client name.
- Username – Get from Kalleo Technologies
- Password – Get from Kalleo Technologies
- Click Save.

- Right click the Profile and click Profile Properties
- At the bottom of the window is the Automation Task Pane - Click "Create a new automated task" (folder icon and green plus)
- Operation - Upload - Click Next
- Select Source File or Folder - Folder you created on the local workstation or network that you have the files to upload from, place a * at the end to upload all.
- Select Destination File or Folder - /* Click Next
- Place check in Delete Source Files After Successful Transfer - Click Next
- Click Finish.
You can test your profile immediately by right clicking on the profile that you just created and select execute. Files, if available, will download into your target folder.
*Note: If you are going to run the service (suggest you do for automated tasks), you must set the service to run with an account that has access to the source/target folder. Set up the folders with UNC names or IPs, not mapped drives. A mapped drive will not be available if the user the drive was created under is not signed in.
Featured Posts
-

How Much Security Do I Need?
0 comments -
Identity and Access Management
0 comments -
Attention: SCAM Alert!
0 comments -
Mission Ready
0 comments -
When is the Right Time to Move to the Cloud?
0 comments