Double Click the green and red "OT" icon in the system tray, a new window will appear in the lower right corner.
Right click the “Scan” Icon on the far left, may also be labeled with a "1".
Right click the “Scan” Icon again and the Settings window will open up.
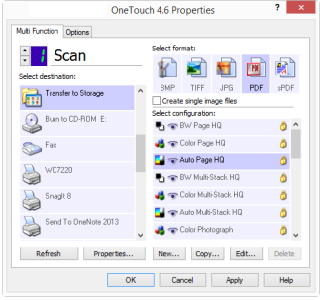
- On the left hand side of the window, click on "FTP"
- On the right hand side, set the format as “TIFF” or “PDF”
- Under Select Configuration, select New configuration and name it CorrecTekScans.
- On the Scan Settings tab, set the Mode to “Grey Scale”
- Set the Resolution to “200 dpi”
- Click on the Page Settings tab, make sure the Size is set to standard, and the correct paper size is selected, usually 8.5x11. Under Improvements and Settings, click the Duplex box and the Skip blank originals box.
- Click the “FTP Transfer” tab.
- Select the “SFTP” radio button.
- Host: “ClientName”.kalleohosting.com
- Port: 22
- User account: Contact Kalleo Technologies
- Password: Contact Kalleo Technologies
- Destination folder: Each site has its own directory with several individual scanner folders underneath.
If your site has more than one scanner, each scanner should have their own destination folder. By default, we create 3, Scanner001, Scanner002 and Scanner003, but additional folders can be made or these can be renames. Just give us a call.
Once configured, save all of your settings.
When scanning, make sure the scanner is set to option 1 (the digital readout on the front).
The OneTouch settings are configured on a per user account basis. What this means is this would require you to configure the scanner settings for each user that is going to scan on each PC.
You can export the registry settings from one user and configure that key to be imported for each user upon login.
**Only proceed after you have your scanner settings setup and tested from the above steps.
**You MUST be signed on as a local admin to perform these steps. Simply running "regedit" as admin does not work.
- Click the start button, type in “regedit” and press enter.
- Expand: HKEY_CURRENT_USER\SoftwarVisioneer
- Right click the “Visioneer” folder and select “Export”
- Name it: ScannerSettings.reg
- Save it to the root of the (C:) drive:
- In Regedit, Expand: HKEY_LOCAL_MACHINE\Software\Microsoft\Windows\Current
- Version\Run
- Right click the “Run” folder and select “New” and then “String Value”.
- Name it “ScannerSetttings”
- Double click “ScannerSetting” to open the “Edit String” window.
- In the “Value Data” box, enter the following: Regedit /s C:ScannerSettings.reg
Featured Posts
-

How Much Security Do I Need?
0 comments -
Identity and Access Management
0 comments -
Attention: SCAM Alert!
0 comments -
Mission Ready
0 comments -
When is the Right Time to Move to the Cloud?
0 comments